
📌 Key Takeaways
Your septic system works silently underground, but uncertainty about its condition can create constant worry—especially when you notice slow drains or unexplained odors.
- Visibility Eliminates Anxiety: A professional inspection transforms hidden threats into documented facts, replacing guesswork with clear measurements of sludge levels, structural integrity, and component function.
- Checklists Ensure Thoroughness: Using a verification checklist during the inspection guarantees your provider checks all three essentials—tank levels, baffles and tees, and flow patterns—without cutting corners.
- Documentation Builds Value: Written inspection reports create a reliable maintenance history that protects your property value, supports confident home sales, and guides smart decisions about when cleaning or repairs are genuinely needed.
- Early Detection Prevents Disaster: Catching a damaged baffle early costs around $300; waiting until the drain field fails can mean a $10,000 replacement—inspections make small problems visible before they become expensive emergencies.
- Control Replaces Worry: Moving from “I hope it’s fine” to “Here’s what we know” gives you command over your home’s most critical waste system and the peace of mind that comes with documented proof of proper care.
Prepared inspection = protected investment and genuine peace of mind.
Suburban homeowners with septic systems will gain confidence here, preparing them for the detailed inspection checklist that follows.
Picture this: You’re sitting in your living room on a quiet Saturday morning when you catch a faint whiff of something unpleasant. You walk outside and notice a soggy patch in your yard that wasn’t there yesterday. Your stomach tightens. Is this the beginning of a septic emergency, or just a minor issue? The not-knowing—that low-level anxiety about what’s happening underground—can be as stressful as the problem itself.
You want the confidence that comes from knowing your system is working properly. You want to protect your home’s value and your family’s health without constantly worrying about invisible problems lurking beneath your lawn. The good news? A thorough septic system maintenance inspection gives you exactly that peace of mind, and a simple checklist ensures you’re getting the quality service you’re paying for.
Key Terminology
- Septic Tank: A buried container that separates solids (sludge and scum) from wastewater before it flows to the drain field.
- Baffles/Tees: Internal components at the inlet and outlet that control flow and prevent solids from escaping the tank.
- Drain Field: The soil area that absorbs and naturally treats the liquid wastewater after it leaves the tank.
A Septic System Maintenance Inspection is a diagnostic assessment of the tank and components to verify function. It’s like a ‘Check Engine’ diagnostic for your yard. Imagine the confidence of handing a potential buyer a certified report saying your septic system is in perfect health. Schedule this before listing your home or if you suspect a problem but don’t see sewage yet.
What A Comprehensive Septic System Inspection Covers
A proper septic system maintenance inspection goes far beyond just checking the tank level. When a qualified professional arrives at your property, they’re evaluating the entire hidden system that keeps your home functioning safely. The inspection covers three critical areas: measuring sludge and scum accumulation to determine if pumping is needed, examining the structural integrity of the tank itself for cracks or deterioration, and verifying that essential components like baffles and inlet/outlet tees are intact and functioning correctly.
Think of your septic system as your home’s hidden immune system. Just as you wouldn’t skip regular health checkups, your septic system needs periodic diagnostics to catch small issues before they become expensive disasters. The tank sits quietly underground, processing all the wastewater from your sinks, toilets, and showers. Over time, solid waste accumulates as sludge on the bottom while lighter materials form a scum layer on top. Between these layers, relatively clear water flows out to your drain field.
When the sludge layer gets too thick, it reduces the tank’s capacity and can lead to solids escaping into your drain field—a problem that can cost thousands to repair. Similarly, damaged baffles or broken inlet tees allow untreated sewage to bypass the settling process entirely. These are the silent failures that an inspection reveals before they escalate into emergencies. In practice, the inspection serves as the verification step that determines whether Septic Tank Cleaning services are needed and why.
A Homeowner’s Inspection Companion: Your Peace of Mind Checklist
Using a checklist during your scheduled inspection ensures your service provider isn’t cutting corners. This tool transforms you from a passive observer into an informed participant who can verify that every critical step is completed. Regular verified inspections build a documented “health history” for your home’s plumbing system, which becomes invaluable when selling your property or troubleshooting future issues.
Phase 1: Tank Levels and Structural Integrity
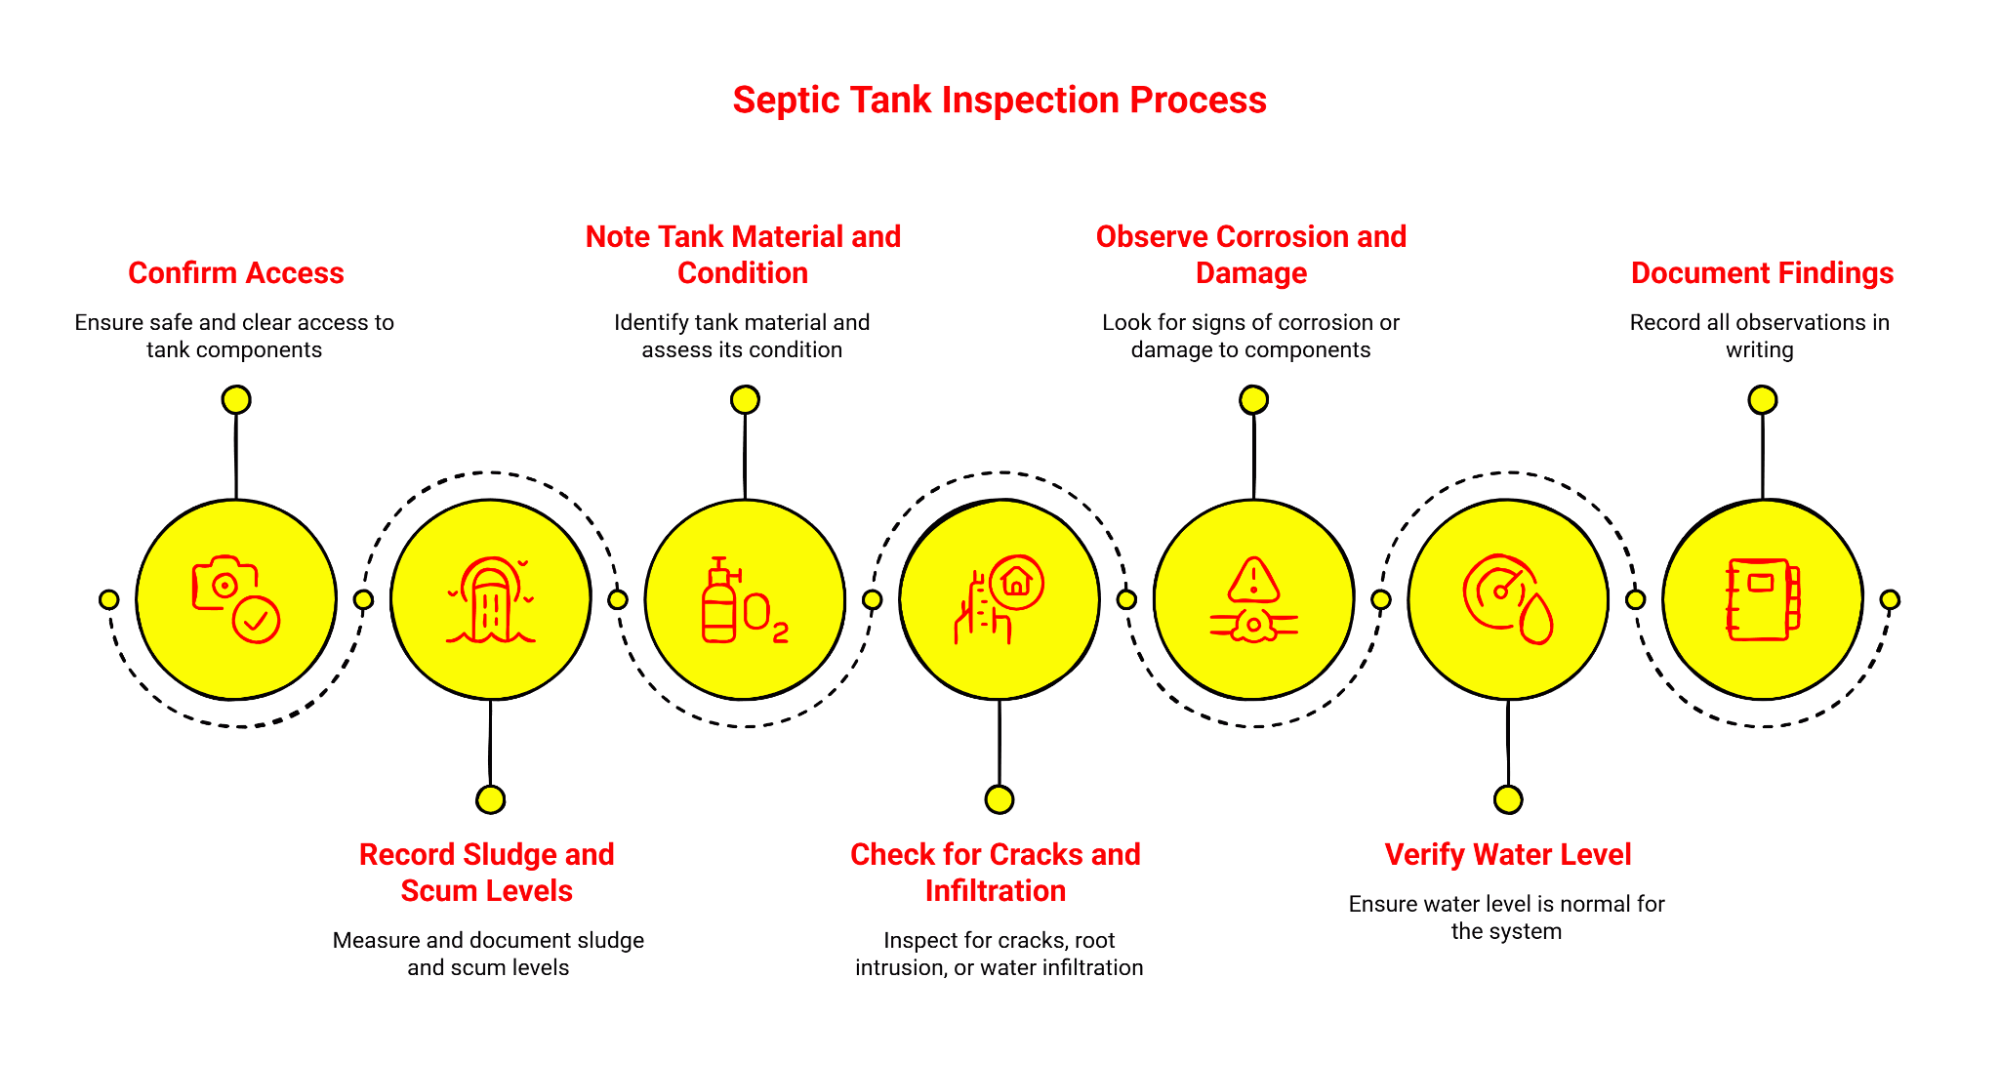
- Confirm safe, clear access to the tank lid(s) and riser(s)
- Record sludge and scum levels with a measuring tool
- Note tank material (concrete, fiberglass, or other) and visible condition
- Check for cracks, root intrusion, or groundwater infiltration at seams
- Observe any signs of corrosion or compromised lids, risers, and gaskets
- Verify water level is normal for the system at rest (not abnormally high or low)
- Document findings in writing; request photos if the provider offers them
The inspector should use a specialized tool called a sludge judge to measure the depth of the sludge layer at the tank bottom and the scum layer at the top. You should see them record these measurements—typically, pumping is recommended when the bottom of the scum layer is within six inches of the outlet pipe, or when the top of the sludge layer is within 12 inches of the outlet.
Phase 2: Baffles, Tees, and Flow Verification
- Inspect inlet baffle or tee: present, intact, and correctly positioned
- Inspect outlet baffle or tee (and effluent filter, if present): intact, seated, and not allowing solids to pass
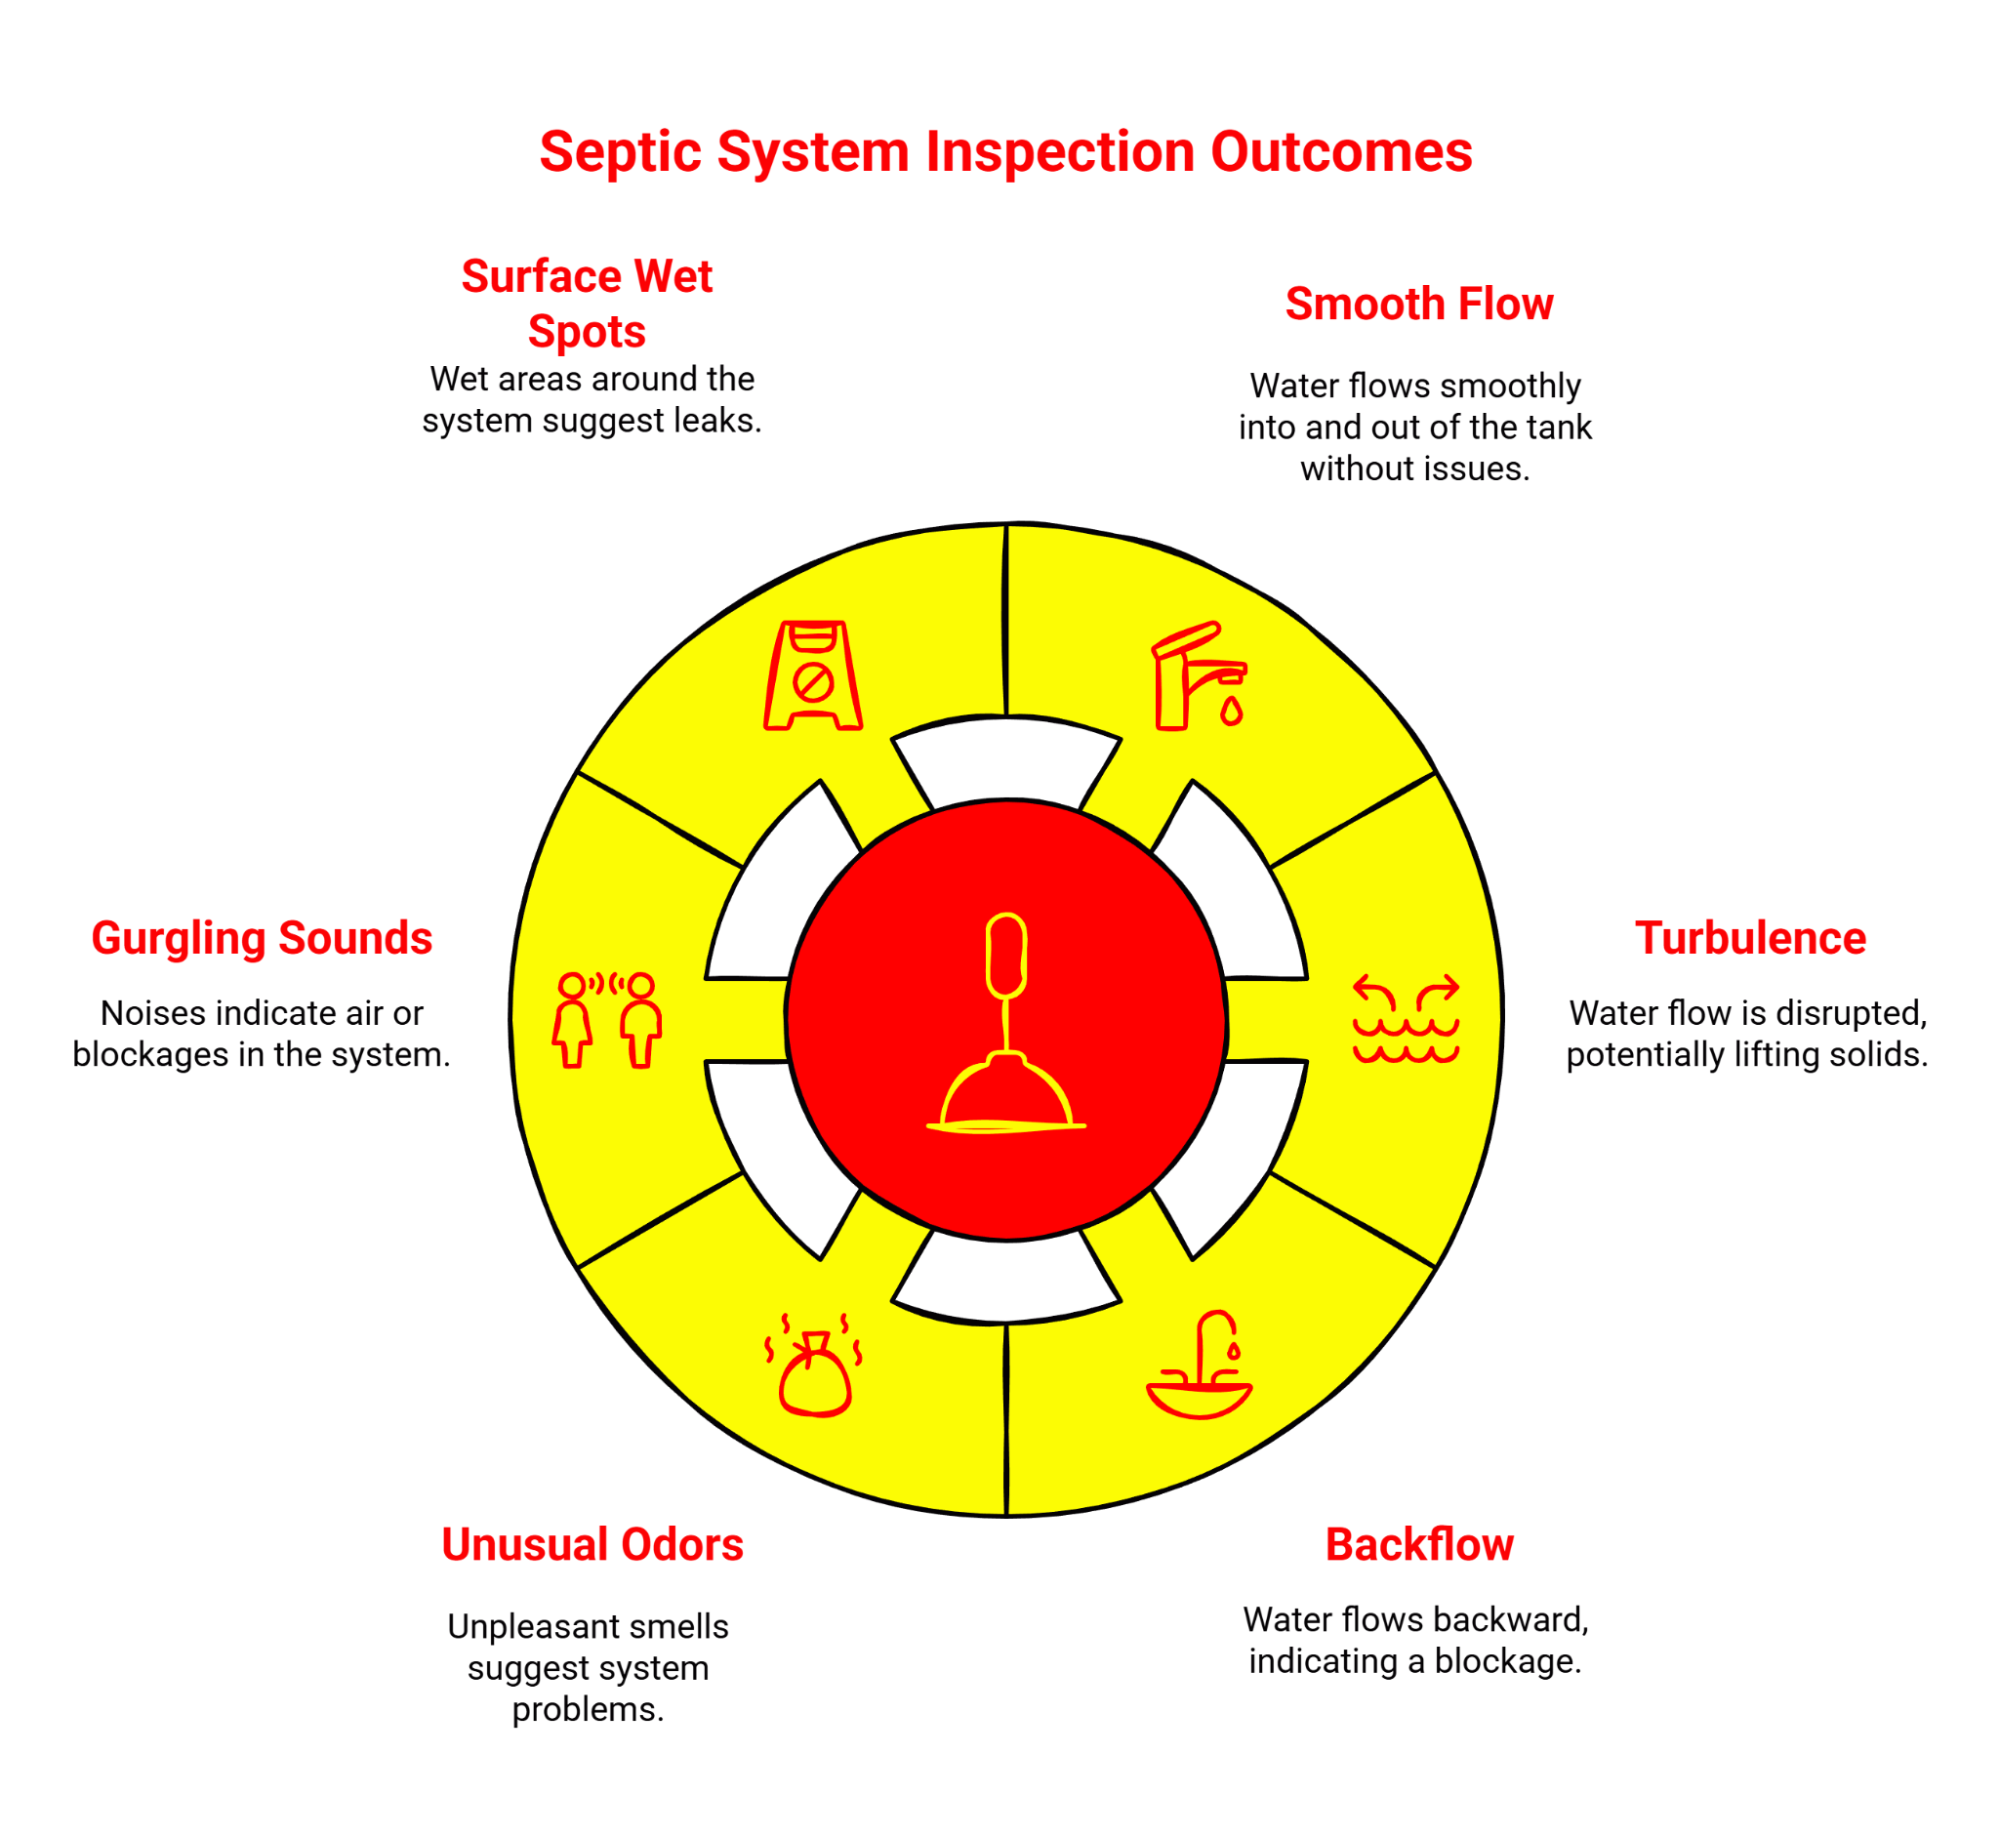
- Run household water briefly (a sink works well) to confirm smooth flow into the tank
- Watch for turbulence that lifts solids or backflow that suggests a blockage
- If safe and applicable, confirm that effluent exits the tank as expected
- Note unusual odors, gurgling sounds, or surface wet spots around the system area
- Record any recommendations such as cleaning a filter or scheduling a pump-out
The inlet baffle or tee directs incoming wastewater downward into the tank, while the outlet baffle or tee only allows liquid from the clear zone to exit toward the drain field. These components are critical, yet they’re often neglected because they’re out of sight. A thorough inspector will verify that both devices are present, properly positioned, and structurally sound. Deteriorated baffles can break off and either clog the outlet pipe or allow solids to escape.
Phase 3: The Critical Documentation Check
- Receive a written report summarizing levels, structural notes, and baffle/tee condition
- Ensure the report lists recommended next steps (if any) with clear reasoning
- File the report with home records to build a maintenance health history—valuable for future service and home sale conversations
- Confirm date, technician name, and provider contact details for traceability
The report should clearly state whether pumping is currently needed, estimate when the next inspection or pumping will be required based on your household size and usage patterns, and note any repairs or concerns that need attention. Some inspectors also take photos or videos of the tank interior, which can be incredibly valuable for your records.
How to Use This Checklist During Service:
- Keep the list visible and follow along as each step is performed
- Ask for plain-language explanations if any terms are unclear
- Before the provider leaves, confirm all checklist items are addressed and documented
Remember, this checklist is for oversight and verification. The actual inspection work involves hazardous biological waste and should only be performed by trained professionals with proper safety equipment.
Deep Dive: Understanding Diagnostic Visibility (Knowing the Unknown)
The concept of diagnostic visibility is central to why these inspections matter so much. Your septic system operates completely underground, processing waste around the clock without any visible indication of its condition. Unlike a leaky faucet or a running toilet, septic problems often remain hidden until they reach crisis levels.
Critical Importance
This invisibility creates a unique challenge for homeowners. By the time you notice foul odors, soggy areas in your yard, or slow drains, the problem has usually been developing for months or even years. Early-stage issues—like a slightly damaged baffle or a tank that’s approaching capacity—give no outward signs at all. Diagnostic visibility means getting clear evidence about what’s happening inside a buried system so your decisions are based on facts, not fear. This reduces emergency callouts, protects property value, and supports healthier home sanitation.
Common Misconceptions
Many homeowners mistakenly believe that if everything seems fine, the system must be working properly. This assumption can be costly. A tank can be 80% full of sludge and still appear to function normally for a while, but you’re living on borrowed time. Similarly, a cracked tank might not show any obvious symptoms until groundwater infiltration causes the drain field to become saturated and fail.
Other misconceptions include thinking a quick glance at the lid is enough—surface checks miss damaged baffles and abnormal tank levels—and assuming all providers inspect the same way. Methods and thoroughness vary significantly, which is precisely why using a checklist ensures the core steps aren’t skipped.
Real-World Implications
The practical difference between superficial awareness and deep diagnostic visibility is substantial. A homeowner who simply waits for problems to appear might face a $10,000 drain field replacement. A homeowner who maintains regular inspection records catches issues early—perhaps a $300 baffle repair or a timely $400 pumping that prevents system failure. The inspection transforms uncertainty into actionable knowledge, giving you control over your home’s most critical waste management system and creating a documented health history that clarifies when cleaning or follow-up service is genuinely necessary.
What If…? Planning for A Critical System Issue Is Overlooked During a Real Estate Transaction
It’s a legitimate concern: what if you’re buying or selling a home and an inspection misses a significant problem? This scenario happens more often than most people realize, especially when inspections are rushed or incomplete during the hectic process of closing a real estate deal.
A Calm Three-Step Plan:
- Validate the facts quickly: If you’re buying, arrange a maintenance inspection promptly and request a written summary of levels, structural condition, and baffle/tee status. If you’re selling, schedule this well before listing.
- Mitigate identified issues: If problems are found, obtain a clear, written service recommendation (such as cleaning or component repair) with straightforward reasoning. Having documentation shows responsible maintenance.
- Document everything thoroughly: Keep all reports together in your home records. They demonstrate good faith and can reassure buyers with objective evidence of system health, or help you establish a baseline if you’re the new owner.
Should a problem be discovered after closing, your documentation becomes crucial. If you have inspection records showing the system was properly maintained, you’re in a much stronger position. Conversely, if you’re the buyer and no inspection was done, you’ll need to establish a baseline immediately after purchase so you can track the system’s condition going forward and avoid surprises.
Your Peace of Mind Is Secured
You started with that uncomfortable uncertainty—the anxiety of not knowing what’s happening beneath your lawn, the concern that a hidden problem might be developing. Now you have something tangible: a clear understanding of what a quality inspection looks like and a practical checklist to ensure you receive the thorough service your home deserves.
Regular verified inspections transform your septic system from a source of worry into a managed asset. Each documented inspection builds your home’s health history, proving to yourself, to potential buyers, and to your peace of mind that you’ve protected your property and your family. The confidence that comes from knowing your system’s true condition—from making the invisible visible—is worth far more than the modest cost of the inspection itself.
Disclaimer: This article provides general information about septic system maintenance inspections for educational purposes. Individual circumstances vary significantly based on factors like the system’s age, local soil conditions, and household usage. For personalized guidance tailored to your home’s sanitation needs, it is recommended to consult with a qualified professional.
Our Editorial Process
Our expert team uses AI tools to help organize and structure our initial drafts. Every piece is then extensively rewritten, fact-checked, and enriched with first-hand insights and experiences by expert humans on our Insights Team to ensure accuracy and clarity.
About the Drane Ranger Insights Team
The Drane Ranger Insights Team is our dedicated engine for synthesizing complex topics into clear, helpful guides. While our content is thoroughly reviewed for clarity and accuracy, it is for informational purposes and should not replace professional advice.